Showing posts with label tutorial link. Show all posts

Monday, June 27, 2011

Felt flowers...how do you wear them?

We had extended family pictures this last weekend. 
Was I ready: NOPE! 
I was especially stumped on flowers and headbands for my girls. 
I was just tired of the same old bows and flowers they wear. 
So I started searching around blogland for new ideas...
we all know it didn't  disappoint! 
Jamielyn over at I {heart} naptime always has amazing ideas!
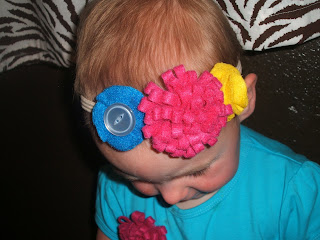
And I totally fell in love with her felt flowers
OR 
maybe her darling little girl! 
Follow her super easy, pictures and all tutorial to get some for your darling little girls!


We were all wearing bright colors and I thought her shirt was just too boring! 
So, I grabbed some snaps and attached them to the shirt and the back of each flower. 


I love how it turned out! and super inexpensive too! 
I might be doing overkill, but I just love these! 
I attached them to the elastic headbands for adults. 
I usually wear them when I workout or am out in the yard to keep my hair out of my face. 
They fit her head perfect and the non slide sticky stuff on the inside keeps it in place.

p.s. totally noticed the water spots on B's shirt after I posted the pic's. haha

How would you wear them? Let me know what creative way you come up with to wear these darling flowers!


Monday, June 20, 2011

tiny hands

A little late but...
This is what I did for my Mom and MIL this year for 
Mother's Day.

  1.  1x12x6' board from HD
  2.  Rust Oleum Heirloom White spray paint
  3. 3 different Stampin' Up ink pads
  4. Silhouette and vinyl
  5. Canyon Black paint
  6. foam brush
  7. sanding block
  8. saw toothed hanger 
  •  I had my hubby cut two 19' long pieces.
  • sanded them down
  • painted the front and sides of board black
  • while that was drying I went to my Silhouette machine and cut the vinyl saying, my kddos names and ages."Grandma's hold my tiny hands for a little while but our hearts forever"
  • attached vinyl to sign.
  • spray painted with my go to Rust-Oleum Heirloom White
  • let dry for a few minutes and removed the vinyl
  • sanded down the edges a bit
  • let dry for a few hours
  • had each of the kids pick out a color of ink and stamped their hands on the board
  • attached a saw toothed hanger to the back for hanging. 
  • and VOILA! 

    Sunday, May 29, 2011

    "B" holder

    I have gone through so many ways to hold my girls' headbands and I finally came up with one I LOVE! 

    Materials Needed:
    4. 1x12x6ft board
    6. Small sponge brush
    8.Saw toothed hanger.
    9. Exacto knife
    10. Scrapbook paper of choice
    11. Hooks.


    I started with a 1x12x6 
    cut (2) 19" pieces for another project {to come this week}
    and this is the remaining piece.
    I took her outside {it was finally nice weather} and spray painted the edges in Rustoleum Heirloom White
    and let dry.
    Next, I nailed in a saw tooth hanger to the back. 
    Measured to the middle and leveled.

    2. I took my piece of scrapbook paper 
    sprayed it with 3m adhesive 
    smoothed it out on to the wood 
    and let dry.
    While that was drying I went to my handy dandy Silhouette and cut out a large B.
    Used the spray adhesive to glue into place.
    After it dried I used Modge Podge to seal the entire board.
    I used my Stampin' Up ink pad to distress the edges.
    Here is another corner.
    Oh yeah, I added a hook to the corner and will be on the hunt for a few more to add across the bottom
    and some darling little knobs for higher up for bracelets and necklaces.
    And on the wall!
    {please pay no attention to the unfinished wall! Trim is going up shortly Which I will post about of couse}

    Wednesday, May 25, 2011

    felt rose balls Part Uno

    Hilary over at Spending Less Living More was my inspiration behind these cuties. 
    She has a super simple, easy to follow tutorial with pictures and all! 

    I used Styrofoam balls my MIL gave me. 
    I didn't realize how crazy expensive these babies are,
    for an awesome alternative
    use Hilary's gossip mag creations. 
    Super simple and cheap! 

    These hang over little B's bed and More are in the making! 
    Ciao!